Slacker…

Ok, i admit it, i’ve been pretty slack with updating this blog on progress and been pretty slack on coding too… I’ve completely redesigned the game as i just didn’t think it was working the way it was and have hit upon a nice theme or hook for it, which is something that was missing in the previous design. I’ve also been learning pixel and vertex shader language and begun the process of upgrading the sprite engine to use those instead. Early days (literally) on that but i promise will post more often with more news!

Events

Every game needs effects; in fact i would go as far as to say they have become vital as they provide the crucial polish and eye candy that users come to expect in modern games. I handle mine in a class called “Events”. It allows small call-back functions to be attached to sprites (or to single variables if required). Each event has it’s own internal timer and can itself spawn more events. I’ve been testing it for a while and have now started using it “in anger” so to speak… it’s all going well so far and is producing some really nice results, albeit only simple fades and movements at the moment. I’ll be adding more and more as the game goes on.

Name

Names are important i think [insert usual metaphorical nonsense about names being important here], and i think it’s about time i let you know the name of this project (i would say drum roll but it really isn’t that exciting – i’ll save that for the announcement that it’s finished!). It’s “Nebulous”.

I messed about with lots of names but decided on this one because 1) i just liked the word and 2) if you google it you get the following definition:

Adjective
  1. In the form of a cloud or haze; hazy.
  2. (of an idea) Unclear, vague, or ill-defined.

That satisfied my sense of humour and touched on a grain of truth (bearing in mind this is my first full game) just enough for it to be cool.

Anyway, naming it is one thing; writing the thing is quite another… My day job has kept me far busier than it should over the last 3 months so nothing major to report at the moment; redesigning stuff really – someone please remind me to make a decent game design before i start coding next time and STICK TO IT! 😉

I’ll try and sort out some screen shots soon.

Rewrites

Had a whole day free today to work on the game; bliss! Spent the time cleaning up a lot of code; texture class and asset management was the first to get an overhaul, then i moved onto the shields, they’ve gone through a few changes lately so the code controlling them needed a lot of cleaning up. Happy that today has been productive but i still worry that the project is way behind schedule and there is still so far to go!

GIT Repositories

After 2 evenings of failure, i’ve finally managed to create a GIT repository for the game project…

On the surface they seem very simple, Xcode will automatically create one for you when you create a new project, but (and it’s a big but), Xcode creates the type of GIT repository that is next to useless if you want to actually have multiple people coding and syncing to a single repository! What i needed was a repo sat on a network drive that acts as the central repository for my iMac and my Laptop (the 2 machines i use for development), so i can randomly develop on either machine and sync changes between them via the networked central repository.

After a lot of googling and an awful lot of trial and error, it would appear i needed to create a “bare” repository and use this as my central network repo. What complicated things even more was that my original project was created without a repo so i also had to add one to my project!

For anyone interested (and just for the record), this is what you need to do:

1. Create the “bare” central network repository: Goto Terminal and “cd” into the directory you want the repo, then type “git init –bare myproject.git”. This will create a folder called “myproject.git” which holds your bare repo.

2. Add a repo to my current Xcode project (call it the local repo): Goto Terminal and “cd” into the directory that holds the project, then type “git init”.

3. Specify which files are to be excluded from the local repo; this is REALLY important as you DON’T want Xcode user interface settings like tabs, window size, editor settings to be pushed to your repo because you’ll be pushing them forever. I often got a kind of recursive loop where i would spend 20 mins constantly committing changes that were nothing but user interface stuff!! Anyway, you just need to exclude .DS_Store and xcuserstate. To do this however you will need to edit a file called “exclude” in the info sub-folder of the projects new .git folder, trouble is, this folder is hidden. To edit open up TextEdit, goto Open file dialog and press Cmd-Shift-Dot(.) to show hidden files. Add the following to the “exclude” file:

.DS_Store

UserInterfaceState.xcuserstate

[ Note; for newer projects i think this is: UserInterface.xcuserstate, but my project required the one above ]

4. Add all project files to the local repo: back in terminal (same directory) type “git add .”

5. Commit our changes to the new local repo: in terminal again type “git commit -m “Initial Commit””.

6. Add the bare network repo you created in step 1 as a “Remote” in the local repo: In your xcode project, goto organiser and select “Repositories”, then click on “Remotes” in the local repo. Click “Add” and type in the name of your network repo (e.g. “MyProjectCentral”) and give it the network location of the myproject.git folder (you can drag and drop the folder into the dialog here and it expands to be the full path). This should now add the network “bare” repo as a remote repo in your xcode project.

7. Push your project to the “bare” network repo: Goto File Menu, “Source Control” and click “Push”. Select the “MyProjectCentral” in the drop down and push the project.

At this stage the bare network repo is now populated with your project. Any changes you now make to your local xcode project should be “Committed” and “Pushed” to your central repo when you’re ready to do so.

You can now create other working copies of this project on other machines by opening Xcode and selecting “Connect to a Repository” from the “Welcome to Xcode” screen. Just type the location of your myproject.git folder when asked and it will clone the project and create a working copy on the new machine.

And that’s it! Now, you will be able to have any number of working copies of the same project on any number of machines; and you can continue working on your project on any machine that is to hand!

Just remmember that any changes you make, ensure you “Commit” and “Push” them to the remote network repo “MyProjectCentral” when you’ve finished. It’s also a good idea to get into the habit of using “Pull” to pull any changes made by someone else (or you on another machine) from the central repo.

Phew… It took a few evenings, but it finally works beautifully…! I went down many dead ends like trying to create “Dummy branches” etc, but trust me… Don’t bother… Creating a “bare” repo is the *proper* way to do it and it works brilliantly.

Right, that’s enough for now. Hope this was of some help to someone!

Mike
Fonts

Well, bmGlyph worked out fantastically well, the sprite engine can now import fonts from it and generate strings using them. Works very well, I’m really pleased 🙂 I upgraded the engine to use texture cells and atlases for each sprite (rather than the standard 64 x 64 only I was using before). Also works very well. I’ve also been thinking about design and been playing around with changing things a little. I think the shields need changing. I think they are too small and I think removing one layer would allow me to expand their size without limiting play area. Also I think they need to be more fragile. 2 hits and their gone is what I’m currently working to and I think that might work better. Allowing them to have multiple hits (and two layers) I think just slows play up… Also been thinking about enemies… The design has altered to allow them to be more like viruses, replicating etc rather than traditional “waves”. Again I think it allows for a better flow of gameplay. Still a lot of stuff to pull together and a lot of heavy coding to do on movements; still early days but a more coherent and tighter design is emerging which I think is a lot better 🙂

Bitmap Fonts and texture atlases

Found a great little program on the mac app store for generating bitmap fonts, its called bmGlyph. If you’re interested in such things its well worth the £5 price tag. Ok, advert over 😉
Now im using bmGlyph its become even more obvious to me that i need to amend the texture atlas routines in the sprite engine… Its been slowly dawning on me that what I’m currently doing is inefficient and unnecessary. Currently i split the texture into 64 x 64 pixel tiles… its simple and works fine but in OpenGL there is no real penalty for having non-uniform boundaries for each sprite texture (e.g. one sprite can be 10 x 63, another can be 256 x 100) and it allows for much more flexibility and efficient use of the texture space. This does however mean re-writing the texture handling code and including a txt parser to import a coordinate map for each sprite within the texture atlas. Ive started work on it today and will carry on with it tomorrow. I’ll keep you posted.

Hiatus

Sorry for the lack of activity recently… Work has been sporadic lately if I’m honest but I’m back on the project again now… Had a load of bugs in the quadtree which are now fixed, querying the tree works beautifully and brings back just the objects within a reasonable range… I’m just recoding the collision detection routines then it’s onto the events class… Stay tuned, more detail in a few days…

Quadtree joy

The quadtree works!! Found a few bugs in the end, all fairly simple but hard to find; first i was passing x and x to a function rather than x and y; second was my mid point for node splitting was being incorrectly calculated (absolute value rather than an offset to parent node coords); third was my coord system is a different direction than I remembered it being (lol) and fourth I was accidentally overwriting nodes that already existed…

Lesson learnt: Never code a quadtree at one in the morning 😉

Still got the collision testing to do but basically the tree splits and builds itself beautifully, i am now officially a happy man 🙂 How fickle programming is… Lol.

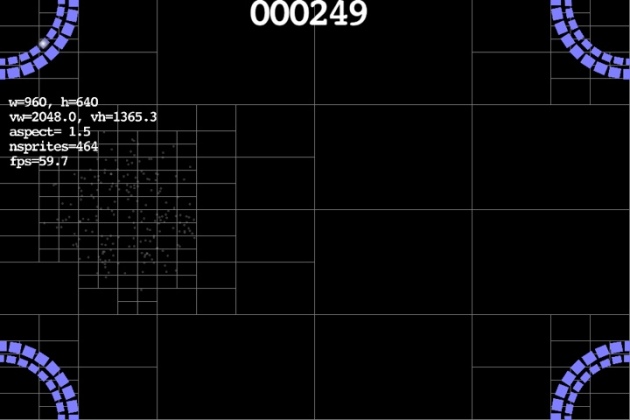
For those that have no idea what I’m on about, look at this picture:

20120516-002321.jpg

The picture shows a series of boxes (or squares) on the screen. The boxes are built up around each object that is on the screen, and fully enclose that object. Each box contains a list of objects that are within it as well as a list of all of its sub-boxes. What’s the point off all this work? Well, it helps me decide which objects are close to each other, and, more importantly which ones are not. Without a quadtree if I wanted to know which objects have collided with each other I would have had to check each object against all other objects which is VERY slow… With a quadtree however I only need to check objects that are in the same box (or in its sub-boxes) as the object I’m checking for collisions. It helps reduce what could be hundreds or thousands of collision detections down to just a tiny handful.

Quadtree frustration

In principle quadtrees are fairly straight forward things… Many years ago I coded a BSP (Binary Space Partition tree) for a 3d engine I was building at the time, so I thought a 2d Quadtree would be fairly simple and quick to write… Mmmm… Got a really horrible bug in it I just can’t find, pulled a 3am stint the other day trying to find it! 😦 I’ll have another go tonight and let you know how I get on… BTW – the bug is in the splitting… It should be the box within box detection code but I can’t see anything wrong with that… Ho hum…